Monday, October 25, 2010

Malting Barley Growth: Fall 2010

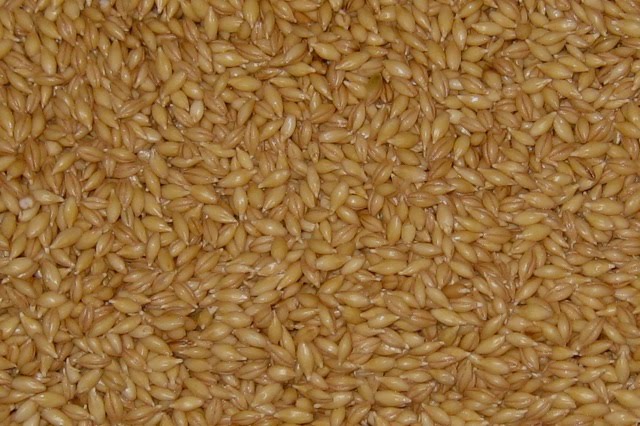
This barley was planted on October 13, 2010 in Northern Virginia. The photo at left was taken seven days after planting and shows barley shoots emerging from the ground. The weather ranged from 49 degrees (overnight) to about 75 degrees during this period. It rained once, the day after I planted. I also watered using a sprinkler one time on about day 6. Birds and squirrels were remarkably kind to the barley this year with very little predation. The dog has been spotted walking through the plot and I just found my 7 year-old son Gunnar's soccer ball in the plot, but overall it is doing well. At this stage it is very resilient. Later, when it has heads of barley, it is prone to lodging (falling over, getting the heads wet, and getting ruined). If you look closely on the far left of the photo, in the middle, you can see a grain that has spindly white roots projecting (called acrospires).


Twelve days after planting (Oct. 25, 2010). The barley below is about three inches high and looking good. As you can see from the photo below (taken the same day) the barley comes up a bit unevenly. There are barley plants in the browner sections, just not as many as elsewhere. This is OK, because the barely will "tiller" -- put off side shoots which will become barley plants that will also produce grain. This barley still probably has three to four weeks of good weather here in Northern Virginia to grow before going essentially dormant for most of the winter (when the weather goes below 50 degrees -- we will have warm snaps occasionally throughout the winter where the barely will seem to be growing again).

It is this relatively mild weather that allows us to plant "winter" barley here in Virginia, as opposed to "spring" barley, which is planted in early spring in areas experiencing colder climates (i.e., upper midwest, the source for much of the US's malting barley). Many of the most famous and high-quality ale malts, like Maris Otter, are two-row winter sown. As far as I know, there is essentially no two-row winter malting barley grown in the United States.

Thursday, October 14, 2010

Home Malting; Making a 12 Pound Batch of Malt in the Kitchen

Homemade crystal malt (left, below) and homemade green malt (right). The following post is about making green malt. I will post about crystal soon. Crystal malt is made from green malt.


Below (Left to right), weighing barley to be malted. This is a 12 pound patch -- 12 pounds of dry barley at the beginning). Malting reduces the weright of the barley a bit, so the end product will weigh less than 12 lbs. Adding cool tap water.


Left: Floating off the chaff. There will likely be some chaff in most barley you will buy or grow yourself. This is the chance to make sure it does not make it into your malt. Right: Steeping barley in cold water for 8 hours. I use 2 pots to make a 12 pound batch of malt.


Straining steeped barley and letting it rest for a few hours before steeping again. The goal is to let the water penetrate the starchy parts of the barley corns and begin the sprouting process. I have read that you can suffocate the grains if they are underwater for more than 8 hours hence the drain and rest process. I cannot corroborate this, but still give the grain a couple hour's rest after each 8 hour steeping.


After steeping and straining twice, transfer the barley to a trug (I use a plastic mortar basin bought from Home Depot) and keep it moist but not sodden. The grains should be chewey when, well, chewed at this stage. Turn the barley frequently and keep it relatively cool. Ideally between 50 and 60 degrees, but 70 is ok. The goal is to avoid mold while maintaining temperature and moisture that facilitates sprouting, so not too warm and not too wet, but not too dry either. This process will go on for between 1 and 4 days. Some sources say it may take 14 days for barley to sprout! In my experience it is much shorter -- in the neighborhood of 1-3 days to sprout and 4-6 days for the whole malting process.


No aspiring maltster is going to want to hear this, but it helps to get up at least once at night to check the moisture level and stir the barley. As you get out of bed at 3 AM it helps to mumble to yourself, "Time to make the malt. Time to make the malt." like the guy in the old Dunkin' Donuts commercials. It takes 2 minutes to stir and adjust moisture, if needed.


Barley two days into the malting process (below). The acrospire (roots) are starting to show. They are the little white shoots at the pointy end of the grains. This is called chitting.


Barley 3 days into the malting process. The acrospires (the visible little white roots) are prominent. The shoot under the husk (which would become the grass of the barley plant) is visible under the husk at this stage, but should be less than 1/2 the length of the grain.


Barley ready for kilning (below) . Notice the shoots starting to emerge from under the husks of some of the grains. I read that you want to kiln when the shoots (not the thin white roots) are the full length of the grain, but still under the husk. At this stage, some shoots are emerging from the husk, some are half the length of the grain, and others are in between. Its a judgment call. I judged this barley to be ready to kiln.


Wet malt going into the dehydrator and oven (below). I find the dehydrator works much, much better, probably because it also has a fan that draws moisture out of the equation. With the dehydrator, I can also keep the temperature around 117 degrees (and always below 125) with great accuracy so as not to kill the enzymes in the barley that facilitate conversion (note the electric thermometer with cable). Unfortunately, the dehydrator is not big enough to kiln a 12 pound batch of malt. Kilning like this takes about 12 hours. I have plans to build a much larger kiln that can handle as much as a bushel of barley (48 pounds) with a thermostat, space heater, and electric box fan. I bought the thermostat and will eventually get around to building the kiln. If it works, ramping up the scale of the rest of the process should be relatively straightforward. limited kilning capacity is the restraining factor at this point.


The finished product. Maybe not as pretty as bought malt, but something to be proud of, especially of you grew the barley yourself.

Growing Malting Barley at Home: Threshing, Winnowing, and Planting


I have been remiss in taking photos and adding text to this blog showing my efforts at home barley growing for malting. In June 2010, I harvested by hand barley from my 1,000 square foot garden plot (photo at left). Unfortunately, I did not take any photos of the harvest.


Here are photos of me and my younger son, Ture, threshing the barley a couple of weeks ago. I made a two level wooden box with a 1/4 inch galvanized hardware cloth screen attached to the bottom of the top box. I basically rub the barley heads through the screen and the barley and chaff fall into the bottom box. A pair of leather gloves help since the barley has brittle parts that can be sharp and cause splinters. This has proven a pretty effective way to get the grain off the heads and the awns (long stalks coming off the tip of each grain of barley) off the grain. The process does not damage the husk of the barley, which is important for all-grain brewing. I can thresh 25 pounds of barley in a fifteen monutes using this cheap and effective method.


Here are photos of me subsequently winnowing the barley. The process involves separating the lighter chaff from the heavier grain. The chaff blows away (notice it on the ground) and the barley grains fall into the tub below the fan. The day was not windy, so I used an electric fan to make breeze. The process works very well (probably removes 98% of the chaff), but does leave some heavier chaff in with the grain. I will have to pick through the grain I will malt to remove as much of the residual chaff since I will want my malt to be free of this non-barley stuff. Note that all the "equipment" for processing barley on a small scale is basically stuff you have sitting around the house. I did have to make the threshing box, but it was from scrap wood, screws, and mesh I already had laying around. I think I could probably process up to maybe 200 pounds rather easily using these techniques.

I tilled the plot three times, each about a week apart to try to give weed seeds a chance to sprout and then be killed by the subsequent tilling. I put come lime and some 10-10-10 fertilizer on the plot and tilled it in.


Today was supposed to be about 60 degrees and rainy, which is perfect barley sprouting weather (barley sprouts above 50 degrees and likes cool weather to grow), so yesterday I tilled the plot (using my 17", 5 hp Sears gas tiller) for the last time and raked it smooth. I broadcast (casting it evenly out of your hand -- think middle ages agricultural techniques here) about 4 pounds of my threshed and winnowed barley seed evenly across the plot. Photo of broadcasting barley seed below.


I then very lightly raked the top of the plot to lightly bury some seed and increase its contact with the soil. This also helps thwart some birds and squirrels, which are tenacious barley-eaters until it puts up shoots.

It rained overnight and the plot looks good. The rain is also helping to keep the pests off the plot, at least temporarily.


If all goes well, I should see green shoots in about a week to ten days. My the time the weather gets really cold here in Herndon, Virginia the barley grass should be about 8 inches high. This grass will sit under the snow and tolerate the cold throughout thew winter. In the spring it will get going early and start putting up the sprouts that will hold the barley heads in April. Then harvest will be in June after the barley turns golden and a grain cracks between your teeth.

Weeds are a big potential problem (which is why I tilled 3 times to try to get resident weed seeds to sprout so I could kill them with the tiller). The goal is not to eliminate all weeds, which I will never be able to do, but to control then so they don't smother the barley. Once it is established, barley grows robustly and can hold its own against most weeds except ones that put up vines.


Above: Photo of planted barley plot (50'x20'), October 13, 2010.

I will publish a post on home malting shortly.